VC Tint 매뉴얼
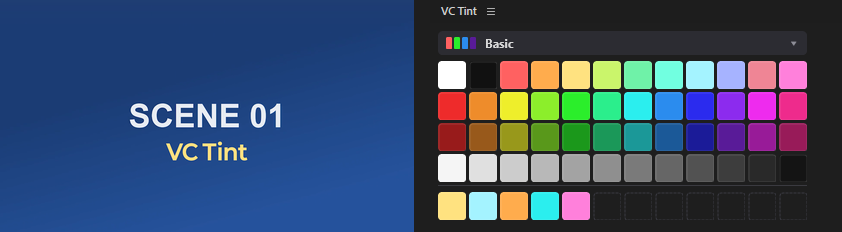
Adobe Premiere에 없는 색 견본(스와치) 패널입니다. 클립을 선택하고 색 칸을 누르면 그 색으로 칠해집니다. 무료입니다(무료 시리얼 키가 필요합니다). · 업데이트 노트
#설치 · 열기
- VC Hub › 내 제품에서 VC Tint를 설치하거나, 홈페이지에서 바로 받아 .ccx 파일을 더블클릭합니다.
- 프리미어를 다시 켜고 Window › Extensions › VC Tint를 엽니다. 원하는 자리에 끌어다 붙여 두세요.
- 처음 켜면 10일 사용 기간이 저절로 시작됩니다(패널 위에 주황색 Trial 배지). 계속 쓰려면 무료 시리얼 키를 이메일로 받아 설정의 SERIAL 칸에 넣으세요. 사용 기간이 끝나면 칠하기만 멈추고, 시리얼을 넣으면 바로 풀립니다.
패널은 프리셋 고르기 한 줄 · 색 칸 · Recent(최근 쓴 색) 한 줄이 전부입니다. 패널 화면은 영어로 나옵니다.
#칠하기
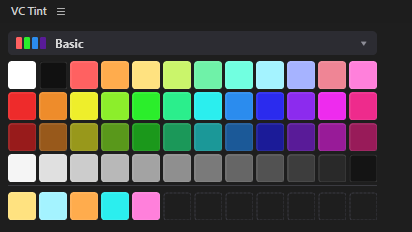
- 타임라인에서 칠할 클립을 선택합니다. 글자 · 도형 · 색상 매트 · 영상 무엇이든 되고, 여러 개를 한꺼번에 골라도 됩니다.
- 색 칸을 누릅니다.
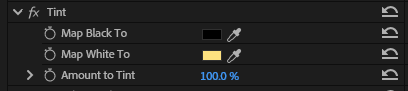
선택한 클립에 Tint 효과가 들어가고, 흰색 부분이 고른 색으로 바뀝니다. 검은 부분(글자 외곽선 등)은 검정 그대로라 흰 글자 · 흰 선 · 흰 박스를 칠할 때 가장 잘 맞습니다. 이미 Tint가 있으면 새로 넣지 않고 색만 바꿉니다.

- 누른 칸에 흰 테두리가 잠깐 보이면 칠해진 것입니다.
- 클립을 선택하지 않고 누르면 칸에 빨간 테두리가 생기고 위 줄에 「Select a clip」이 잠깐 뜹니다.
- 되돌리기는 프리미어의 Ctrl+Z(맥 Cmd+Z)입니다. 처음 칠한 클립은 두 번(Tint 넣기 · 색), 다시 칠한 클립은 한 번입니다.
- 칸에 마우스를 올리면 색 이름과 값(#RRGGBB)이 보입니다.
#프리셋
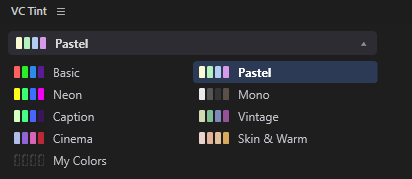
위 줄을 누르면 프리셋 목록이 펼쳐집니다. 한 프리셋은 12색 × 4줄 = 48색입니다.
- Basic — 흰색 · 검정과 밝은 10색, 선명한 색, 진한 색, 회색
- Pastel · Neon · Mono · Caption · Vintage · Cinema · Skin & Warm — 분위기별 팔레트
- My Colors — 내가 담아 둔 색(아래)
#My Colors — 내 색 담기
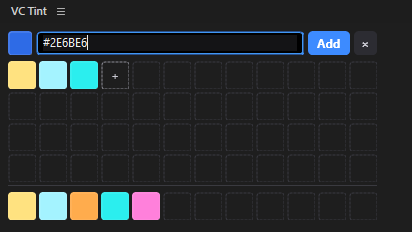
회사 · 채널 색처럼 자주 쓰는 색을 47개까지 담아 둡니다.
- + 칸 — 위 줄에 입력 칸이 열립니다. 클립을 선택해 두었으면 그 클립의 색이 미리 채워져 있어 Enter만 누르면 됩니다.
#2E6BE6같은 값을 붙여 넣어도 됩니다. - Recent 칸 우클릭 — 방금 쓴 색을 바로 담습니다.
- 끌어서 옮기기 — 칸을 끌어 다른 칸에 놓으면 순서가 바뀝니다.
- 우클릭 › Remove — 그 색을 뺍니다.
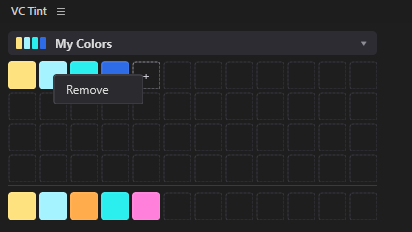
프리미어 Properties 패널의 스포이드로 화면에서 색을 찍어 클립을 칠한 뒤, 그 클립을 선택하고 +를 누르면 찍은 색이 My Colors에 담깁니다.
#Recent — 최근 쓴 색
맨 아래 한 줄입니다. 칠할 때마다 그 색이 맨 왼쪽에 들어가고, 12개가 넘으면 오래된 색부터 빠집니다. 프리셋을 바꿔 가며 칠해도 여기 나란히 남아 비교하기 좋습니다.
- 클릭 — 그 색으로 다시 칠하기
- 우클릭 — My Colors에 담기
설정에서 숨길 수도 있습니다.
#세로로 쓰기
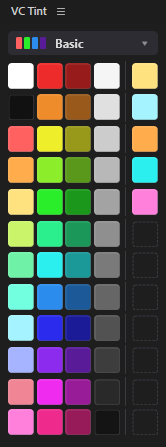
패널을 좁고 길게 붙여 쓰려면 설정에서 Layout › Vertical을 고릅니다. 가로 배치를 그대로 90도 돌린 모양이라 색 순서가 같습니다(프리셋 한 줄이 한 열). Recent는 오른쪽 한 열이 됩니다.
#설정
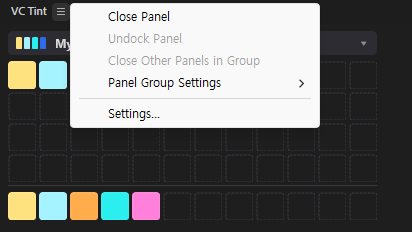
패널 이름 옆 ≡ 메뉴 › Settings…를 누르면 패널 자리에 설정이 열리고, Done으로 닫습니다.
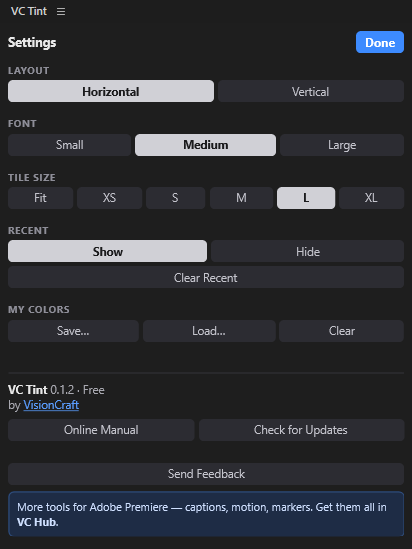
- Layout — Horizontal(가로) · Vertical(세로)
- Font — 글자 · 단추 크기 Small · Medium · Large
- Tile Size — 칸의 최대 크기. Fit은 패널 폭을 꽉 채우고, XS · S · M · L · XL은 패널을 넓혀도 그 크기에서 멈춥니다. 큰 자리에 붙여 둘 때 쓰세요
- Recent — Show · Hide · Clear Recent
- My Colors — Save… 지금 내 색을 글자 파일(.txt, 한 줄에 색 하나)로 저장 · Load… 파일에서 불러오기(지금 내 색과 바꿈) · Clear 모두 비우기. 메모장으로 만든 색 목록도 불러올 수 있어 팀끼리 같은 팔레트를 나눠 쓰기 좋습니다
- Serial — 무료 시리얼 키(VT-로 시작)를 붙여 넣고 등록합니다. 다른 PC로 옮길 때는 이 PC에서 해제하세요. 한 시리얼은 PC 3대까지 쓸 수 있습니다
- Online Manual — 이 매뉴얼 · Check for Updates — 새 버전 확인
- Send Feedback — 의견 · 버그 · 원하는 색을 바로 보냅니다(답장 받을 메일은 선택)
새 버전이 나오면 패널 맨 위에 알림 띠가 뜹니다. 누르면 VC Hub 내 제품이 열립니다.
VC Tint Manual
The color swatch panel Adobe Premiere doesn't have. Select clips, click a color, and they're painted. Free (a free serial key is required). · Update notes
#Install · open
- In VC Hub › My Products, install VC Tint — or download it right from the website and double-click the .ccx file.
- Restart Premiere and open Window › Extensions › VC Tint. Dock it wherever you like.
- The first time you open it, a 10-day period starts by itself (an orange Trial badge at the top of the panel). To keep using it, get a free serial key by email and enter it in the SERIAL field in Settings. When the period ends only painting stops; entering the serial unlocks it right away.
The panel is just a preset row · color tiles · a Recent row.
#Paint
- Select the clips to paint in the timeline — text, shapes, color mattes, footage, any number at once.
- Click a color tile.
A Tint effect is added and the white parts turn into the chosen color. Black parts (like text outlines) stay black, so it works best on white text, lines and boxes. If a clip already has Tint, only the color changes.
- A white outline flashes on the tile when it's done.
- Clicking with no clip selected shows a red outline and "Select a clip" for a moment.
- Undo with Premiere's Ctrl+Z (Cmd+Z on Mac) — twice for a clip painted the first time (add Tint · color), once after that.
- Hover a tile to see its name and value (#RRGGBB).
#Presets
Click the top row to open the list. Each preset has 12 colors × 4 rows = 48 colors.
- Basic — white, black and 10 bright colors, vivid, deep and grays
- Pastel · Neon · Mono · Caption · Vintage · Cinema · Skin & Warm — palettes by mood
- My Colors — colors you keep (below)
#My Colors
Keep up to 47 colors you use often, like brand or channel colors.
- + tile — opens an input in the top row. If a clip is selected its color is already filled in — just press Enter. You can also paste a value like
#2E6BE6. - Right-click a Recent tile — keeps that color right away.
- Drag a tile onto another to reorder.
- Right-click › Remove to take a color out.
Paint a clip with the eyedropper in Premiere's Properties panel, select that clip and press + — the picked color goes into My Colors.
#Recent
The bottom row. Each color you paint with goes to the left; after 12, the oldest drops off. Switch presets as you paint and compare the results side by side here.
- Click — paint with it again
- Right-click — keep it in My Colors
You can hide it in Settings.
#Vertical
To dock the panel tall and narrow, choose Layout › Vertical in Settings. It's the horizontal layout turned 90°, so the color order stays the same (each preset row becomes a column), and Recent becomes the column on the right.
#Settings
Open the ≡ menu next to the panel name › Settings…. Settings open in place of the panel; Done closes them.
- Layout — Horizontal · Vertical
- Font — text and button size: Small · Medium · Large
- Tile Size — the largest a tile gets. Fit fills the panel width; XS · S · M · L · XL stop at that size however wide the panel is — handy when the panel is docked somewhere big
- Recent — Show · Hide · Clear Recent
- My Colors — Save… to a text file (.txt, one color per line) · Load… from a file (replaces your current colors) · Clear all. A color list made in a text editor loads too — easy to share one palette with your team
- Serial — paste your free serial key (starts with VT-) and register it. Deactivate on this PC when moving to another one. One serial works on up to 3 PCs
- Online Manual — this page · Check for Updates
- Send Feedback — send ideas, bugs or colors you'd like (email optional, for a reply)
When a new version is out, a bar appears at the top of the panel; click it to open My Products in VC Hub.